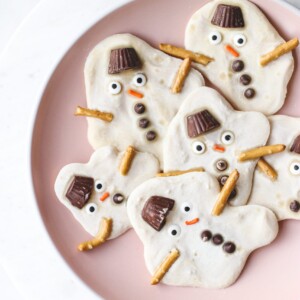
Melted Snowman Bark (Vegan & Gluten-Free)
Dec 01, 2018 • Updated Nov 22, 2024
This page may contain affiliate links, which means I will make a small commission for products purchased through my link.
This melted snowman bark is a fun, festive take on a classic treat for the holiday season! While traditional versions use non-vegan ingredients like white chocolate and peanut butter cups, my version swaps them out for plant-based, gluten-free, soy-free, and nut-free alternatives, making them perfect for any crowd.

Table of Contents
Why You’ll Love Melted Snowmen Bark
Typically, a melted snowman bark recipe is made with different types of candy like white chocolate, M&Ms, and peanut butter cups – obviously non-vegan. So I did one of my favorite things and challenged myself to create a version that’s not only vegan but also gluten-free, soy-free, and nut-free. The result? An allergen-friendly, fun treat that’s adorable and delicious! For more festive flavour, you might also love these Choc Gingerbread Bliss Balls – another vegan, gluten-free option for the holidays.
This bark is also the perfect opportunity for a fun family activity to kick off the winter season! Set up an assembly line with the whole family with toppings in little bowls so everyone can design their own snowmen. Kids will love choosing the hats, arms, and decorations. To make things easier, pre-slice the seed butter cups and prep everything before melting the chocolate. That way, the little ones can decorate while the chocolate is still soft! And while the assembly line is up and running, why not add these almond butter gingerbread cookies to the fun?!
Ingredient Notes & Substitutions


- White chocolate: I use about 3 bars of No Whey. Dairy-free alternatives like vegan white chocolate chips work great instead if you prefer.
- Mini chocolate chips: I use the Enjoy Life mini chocolate chips which are allergen-free, and the perfect miniature size! These serve as buttons on the snowman and add a touch of sweetness. Cacao nibs can be used for a less sugary option.
- Mini seed butter cups: I use the No Whey Pea-Not Butter Cups made with seed butter instead of nut butter. These create adorable hats for the snowmen and keep the treat nut-free. Small vegan peanut butter cups also work if allergies aren’t a concern.
- Orange sprinkles: I use this vanilla funfetti sprinkle blend from Hardcore Sprinkles. It is free of the top 8 allergens, which is awesome because it’s hard to find soy-free sprinkles. The sprinkles represent the snowman’s carrot nose. Orange gel icing or tiny fruit candies are fun alternatives.
- Pretzel sticks: I use Quinn Snacks gluten-free and vegan sea salt pretzel rods. Pretzel rods act as playful snowman arms and bring a salty crunch. Gluten-free pretzels are perfect for those with dietary needs. Bonus points if you find oddly shaped rods in your bag! They make for extra fun and expressive arms.
- Homemade candy eyes: These small candy eyes add personality to your snowman. Ready-made vegan candy eyes can be used if you want to skip the DIY step. I used this recipe for homemade candy eyes from Petite Allergy Treat’s blog.
See the full printable recipe card below for exact ingredient amounts and instructions!

How to Make Melted Snowman Bark
- Step 1: Line a large baking sheet with parchment paper
- Step 2: Gather and prep all your ingredients before starting. You’ll need to work quickly to place everything on the chocolate before it sets.
- Step 3: Slice the seed butter cups in half. The cut side will sit flat and act as the snowman’s hat.
- Step 4: Chop the white chocolate into small pieces – this makes it melt faster and more evenly.
- Step 5: Set up a double boiler by placing the chocolate in a heatproof bowl, then nestling that bowl inside a larger pot filled with a bit of water. Bring the water to a boil and stir the chocolate until it’s completely melted and smooth.
- Step 6: Use a spoon to make little puddles of melted chocolate on the parchment. Aim for about the thickness of a chopstick – okay, not the best comparison, but you get the idea!
- Step 7: While the chocolate is still soft, add the decorations: place the seed butter cup as the hat, the eyes below, an orange sprinkle for the nose, three mini chocolate chips as buttons, and two pretzel rods as arms.
- Step 8: Let everything cool completely until the chocolate hardens, then enjoy your cute little melted snowman treats!

Secrets to Success
- Trim the bottoms off of your mini seed butter cups with a warmed knife before using them as the hats.
- Drizzle vegan dark or milk-style chocolate over the snowmen for extra sweetness, or dust with edible glitter for sparkle.
- Add peppermint extract to the chocolate for a fun, minty twist!
- Break the bark into pieces for dessert platters, or wrap in clear treat bags with festive ribbons for a cute, edible gift.
- Kids of all ages will love these adorable melted snowman bark. This is a fun recipe that is perfect for bringing the holiday spirit. These little snowman puddles are guaranteed to spread cheer at holiday parties, gift exchanges, or a cozy holiday dinner!
Recipe Tips
- Add these to a dessert platter alongside my healthy peanut butter blossoms and other festive treats, or offer them as party favors – guests will love taking home a snowman treat!
- The Christmas season is upon us so why not give these little cuties as a gift? Break the white chocolate bark into irregular pieces and wrap them in clear treat bags tied with festive ribbons.
- Serve with my creamy vegan hot cocoa!
Storage Tips
Room temperature: Store your melted snowman bark in an airtight container at room temperature for up to a week. Keep it away from direct sunlight or heat to prevent the chocolate from melting or softening.
Fridge: If your home is warm, store the bark in the fridge. Place parchment between layers to avoid pieces sticking together.
Freezing: Freeze the bark in an airtight container or freezer-safe bag. Be sure to add parchment between layers, and thaw at room temperature for about 10 minutes before serving.
Recipe FAQs
Yes, but melt it in 15 – 20 second bursts, stirring between each one to prevent the chocolate from burning. Be patient – low and slow is the way to go!
The key is to have everything prepped beforehand. As soon as you spoon the chocolate puddles onto the parchment, decorate right away before the chocolate begins to harden.
Absolutely! If white chocolate isn’t your thing, you can make melted snowman chocolate bark by using dark or milk-style vegan chocolate. Keep in mind that it’ll change the look of the snowman, but it’ll still taste amazing.
This usually happens if the chocolate layer is too thin. Make sure the puddles are thick enough (around the width of a chopstick) to prevent cracking as they harden.
More Easy Recipes


If you make this recipe, be sure to let me know what you think with a star rating and comment below! Follow me on Instagram for more delicious recipes!
Melted Snowman Bark
Ingredients
- white chocolate I used about 3 bars via No Whey
- mini chocolate chips via Enjoy Life
- mini seed butter cups via No Whey
- orange sprinkles
- pretzel rods via Quinn Snacks
- homemade candy eyes via Petit Allergy Treats
Instructions
- Line a baking sheet with parchment paper.
- Prep all your ingredients first and make sure they’re on hand, as you’ll need to place the accessories onto the chocolate before it hardens and cools.
- Cut your seed butter cups in half. The side that you cut open will lay flat and become the snowman hat!
- Chop white chocolate into small pieces to make melting easier.
- Use the double boiler method, by placing chocolate in a small heat safe bowl, and placing that bowl inside of a larger pot. Fill the space between the outside of the bowl + the pot with water. bring to a boil and stir as the chocolate melts until even.
- Using a spoon, make small puddle shapes with the melted white chocolate. Make the layer about as thick as a chopstick (that was a bad analogy, but go with it!).
- Place the seed butter cup hat on top, the eyes underneath, the orange sprinkle in between the eyes, three mini chips down the center as buttons and finally, two pieces of pretzel rods for arms.
- Allow to cool until fully hardened, then enjoy!
Nutrition information is automatically calculated, so should only be used as an approximation.