Easy Creamy Garlic Beetroot Hummus Recipe
Jun 16, 2018 • Updated Jun 17, 2024
This page may contain affiliate links, which means I will make a small commission for products purchased through my link.
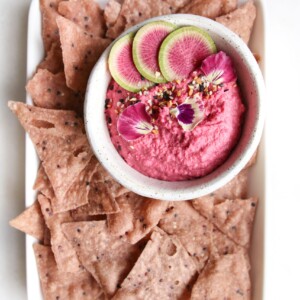
An easy, homemade recipe for Garlic Beetroot Hummus! This delicious and vibrant, homemade hummus is great to spread on toast, use in sandwiches and wraps, and dip into with crackers or fresh veggies of choice.

What Makes This Beetroot Hummus Recipe Great
Here’s a spin on a classic hummus recipe I use to make a super simple Garlic Beetroot Hummus (naturally bright pink thanks to beets!). I featured this hummus in my latest Pink Food Challenge YouTube video, and it makes for a beautifully colored spread for sandwiches and toast, and of course, is a delicious recipe to dip into.
This recipe is very modifiable and I find that everyone likes their hummus a particular way–some like it chunky, some like it creamy, some like it mild, and some like it garlicky–so I recommend tasting as you go and adding more/less spices to suit.
This creamy beet hummus recipe is made from a handful of simple ingredients you probably already have at home, like canned chickpeas, fresh garlic, beets, nutty tahini, and lemon. That, and a whole lot of spice for flavor. While most of the base flavor in this recipe comes from garlic, the beets also add an earthy dimension to the hummus and the gorgeous pink color.
If you’re not a fan of raw beets, I highly encourage giving this hummus a try because it’s the perfect touch of beet flavor, without the “dirt-like” taste or earthy flavor that some people experience. It’s the perfect healthy snack, appetizer, or dip for any meal. Plus, the gorgeous color is a novelty I will never get sick of!

The Details
- This recipe is vegan, gluten-free, oil-free, grain-free, nut-free, and whole-food plant-based.
- You can prep this in advance, and it will store well for about 4-5 days in the refrigerator. I like to make a batch on Sundays to use throughout the week.
- Dip your veggies or crackers into this hummus, or spread it on toast. It pairs well with avocado and also works as a delicious sauce in burgers, sandwiches, and wraps.
- Chickpeas → are high in protein, and fiber and support healthy bone and heart health.
- Beets → support heart health, are rich in antioxidants, and are a great source of manganese, folate, and vitamin B2. They regulate blood pressure and can be a great supportive food pre and post-workout.
Ingredient Notes
- Cooked Chickpeas: Also called garbanzo beans if you’re having a hard time finding them.
- Steamed or Roasted Beet: Use one small fresh beetroot. You’ll want to cook it until it is fork tender so it blends easily.
- Garlic Cloves
- Tahini
- Fresh Lemon Juice
- Salt
- Unsweetened Non-Dairy Yogurt
- Paprika
- Cumin
Step-by-Step Instructions
- Prepare your chickpeas and beets according to the notes in “Secrets to Success”. If roasting the beets in the oven, preheat your oven and line a baking sheet with parchment paper.
- Add chickpeas and lemon juice to your food processor, and begin to purée until fairly smooth. Next, add your beets and garlic and purée again until smooth.
- Next, add tahini and non-dairy yogurt if using and you guessed it–purée again until completely smooth, this time giving your food processor 2-3 minutes to blend.
- If you’d like to adjust the texture, you can add in cold water by the tablespoon, purée-ing every time you add to the mixture.
- Once you’re happy with the texture, add salt, purée to distribute, and any additional spices.

Secrets to Success
- For best results, I recommend roasting your beets beforehand or steaming them. Steaming is quicker and in my opinion, less messy, however roasting is a great way to mellow out the beet flavor. You can use pre-cooked beets sold at the grocery store, but for the best color payoff, you’ll want to prep them at home yourself.
- If using canned chickpeas, opt for chickpeas with no added ingredients (salt is ok!). It also helps the texture if you remove the chickpea skins. You can skin the chickpeas by laying them out on a kitchen towel, covering them with another towel, and rubbing them back and forth to help loosen them up. Trust me when I say it helps to really achieve the creamiest hummus compared to store-bought options. Also, if you’d like to cook your chickpeas from scratch, you can opt to do that as well.
- To add to the texture, we’re also adding tahini, which is a used ingredient when making traditional hummus anyway. Since we aren’t adding oil, tahini will add the fat to the recipe and also give us maximum creamy texture. You can also add a non-dairy yogurt of choice (make sure it’s unsweetened and plain, don’t use vanilla!), which really fluffs it up even more.
- Finally, to amplify the garlic flavor in this recipe, I like to use roasted garlic instead of raw garlic. I have a great oil-free roasted garlic recipe on the blog you can check out here!
Serving Tips
Serve this garlic beetroot hummus in a serving bowl with your favorite tortilla chips, pita chips, pita bread or another crusty bread, and crunchy veggies like carrot sticks, cucumbers, bell peppers, tomatoes, and celery sticks. You can also use it as a spread for sandwiches, wraps, and more!
While this recipe does not contain any oil, feel free to drizzle a little bit of extra virgin olive oil atop for garnish.
Storage Tips
Store leftover beet hummus in an airtight container in the fridge for up to 4-5 days. Give it a good stir and serve!
More Vegan Dip Recipes
- Sweet Potato Miso Dip
- Oil-Free Roasted Garlic
- Goes With Everything Green Sauce
- Kale Caesar Salad + Garlicky Chickpeas
- 10 Tahini Recipes (Sweet & Savoury)
If you make this recipe, be sure to let me know what you think with a star rating and comment below! Follow me on Instagram for more delicious recipes!
Easy Creamy Garlic Beetroot Hummus Recipe
Ingredients
- 2 cups cooked chickpeas skins removed
- 1 small roasted or steamed beet about the size of 1 and a half golf balls, more if you’d like a richer colour and flavour
- 3-4 cloves garlic raw or roasted
- 4-5 tablespoons tahini more as desired
- iced water as needed
- 1 tbsp lemon juice
- 1 tsp salt
- optional but recommended
- 2 tablespoons unsweetend non-dairy yogurt
- pinch of paprika
- 1/2 tsp cumin
Instructions
- Add chickpeas and lemon juice to your food processor, and begin to purée until fairly smooth. Next, add your beets and garlic and purée again until smooth.
- Next add tahini and non-dairy yogurt if using and you guessed it–purée again until completely smooth, this time giving your food processor 2-3 minutes to blend.
- If you'd like to adjust texture, you can add in cold water by the tablespoon, purée-ing every time you add to the mixture.
- Once you're happy with the texture, add salt, purée to distribute, and any additional spices.
Notes
Secrets to Success
- For best results, I recommend roasting your beets beforehand or steaming them. Steaming is quicker and in my opinion, less messy, however roasting is a great way to mellow out the beet flavor. You can use pre-cooked beets sold at the grocery store, but for the best color payoff, you’ll want to prep them at home yourself.
- If using canned chickpeas, opt for chickpeas with no added ingredients (salt is ok!). It also helps the texture if you remove the chickpea skins. You can skin the chickpeas by laying them out on a kitchen towel, covering them with another towel, and rubbing them back and forth to help loosen them up. Trust me when I say it helps to really achieve the creamiest hummus compared to store-bought options. Also, if you’d like to cook your chickpeas from scratch, you can opt to do that as well.
- To add to the texture, we’re also adding tahini, which is a used ingredient when making traditional hummus anyway. Since we aren’t adding oil, tahini will add the fat to the recipe and also give us maximum creamy texture. You can also add a non-dairy yogurt of choice (make sure it’s unsweetened and plain, don’t use vanilla!), which really fluffs it up even more.
- Finally, to amplify the garlic flavor in this recipe, I like to use roasted garlic instead of raw garlic. I have a great oil-free roasted garlic recipe on the blog you can check out here!
Serving Tips
Serve this garlic beetroot hummus in a serving bowl with your favorite tortilla chips, pita chips, pita bread or another crusty bread, and crunchy veggies like carrot sticks, cucumbers, bell peppers, tomatoes, and celery sticks. You can also use it as a spread for sandwiches, wraps, and more! While this recipe does not contain any oil, feel free to drizzle a little bit of extra virgin olive oil atop for garnish.Storage Tips
Store leftover beet hummus in an airtight container in the fridge for up to 4-5 days. Give it a good stir and serve!Nutrition information is automatically calculated, so should only be used as an approximation.
This post may contain affiliate links.


3 Comments