Almond Crusted Crispy Baked Tofu Recipe
Aug 07, 2020 • Updated Oct 17, 2023
This page may contain affiliate links, which means I will make a small commission for products purchased through my link.
A delicious way to enjoy tofu, Almond Crusted Crispy Baked Tofu! This crunchy, flavourful tofu recipe is vegan, gluten-free, grain-free, and oil-free. Plus, it comes together in under 30 minutes!

Reasons You’ll Love This Recipe
Crispy Baked Tofu! It’s crunchy, crispy, flavourful, and so versatile. You can enjoy it as is or toss in your favourite sauce and serve it atop salads, in nourishing bowls or noodle bowls. It’s high in protein and slightly more nutritious than a traditional breadcrumb-coated tofu because it calls for nuts instead!
I typically like to bake these tofu cubes in the oven. However, you can also deep-fry if preferred or bake in an air fryer. There are a few steps involved, but it will seriously uplevel your tofu game. Trust me!
This delicious dish is vegan, gluten-free, grain-free, refined sugar-free, and oil-free.
Ingredient Notes
- Almonds and walnuts (but of course!)
- Extra firm tofu
- Rice flour (or arrowroot starch/cornstarch)
- Soymilk (or other non-dairy milk of choice)
- Seasonings like nutritional yeast, garlic powder, onion powder, smoked paprika, and gluten-free soy sauce.
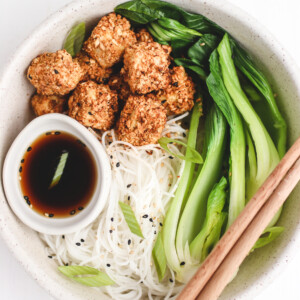
To serve, I recommend rice noodles, bok choy, and a delicious Asian-style dressing like my Tamari Citrus Vinaigrette or Zaru Soba Sauce.
Step-by-Step Instructions
- Preheat oven to 425F degrees while you prepare your tofu. If using an air fryer, please see the notes below.
- Next, drain and press tofu using a tofu press, or wrapping your tofu in a kitchen towel or paper towels, and place a heavy weight on top (a frying pan does a great job!).
- Prepare your nuts by dry toasting on a frying pan or cast iron skillet for a few minutes on medium heat. Continuously toss by shaking the pan or using a spatula to avoid burning. Even though nuts are already roasted, giving them a toast will help to bring out flavor and remove any excess moisture. You can skip this step, but I highly recommend it!
- After toasting, let cool for a few minutes and blitz nuts in a food processor until mealy–don’t blend too much, or it will turn into nut butter! Think breadcrumb texture.
- Next, prepare 3 small bowls. In bowl 1, add rice flour. In bowl 2, add soymilk mixed with gluten-free soy sauce. Finally, in bowl 3, add your nut mixture with garlic powder, onion powder, paprika, and salt.
- Now take tofu and slice into cubes. I like to slice into thirds horizontally as I find the smaller the tofu piece, the more flavor and crust per bite!
- Prepare a baking sheet lined with parchment paper or a baking mat and begin to coat tofu. Grab a tofu cube, coat it in rice flour, quickly dip it into the milk mixture, and finally, toss and coat it in the nut mixture. Transfer coated pieces onto the baking tray and repeat until all the tofu is coated.
- Bake for 12-15 minutes, flipping at the halfway point, until tofu is crisp and golden brown. If using an air fryer, bake at 375F for about 12-15 min, flipping or shaking the basket at the halfway point.
Secrets to Success
- I recommend using shallow, larger bowls when preparing your tofu so that it’s easier to coat tofu pieces evenly. If you’d like to take a shortcut, you can toss your tofu in flour in a larger bowl and shake to cover but do not shortcut the plant milk dipping step.
Serving Tips
To serve this tofu, you can actually bake it a second time with a favourite sauce on top. After baking, toss in the sauce and pop it back in the oven for 5-10 minutes. This is especially delicious with sauces like:
- Healthy Buffalo Sauce
- Healthy Teriyaki Sauce
- Gluten Free Gochujang Sauce
- Barbeque Sauce (by Simply Quinoa)
- Sweet & Sour Sauce (by Okonomi Kitchen)
You can also use these crispy baked tofu cubes in a tofu stir-fry with your favorite veggies, atop a salad, and more!
Storage Tips
- Store leftover crispy baked tofu in an airtight container in the refrigerator for up to 4 days. Reheat in the air fryer or stove top to retain the crispy and crunchy texture.
Recipe FAQs
One big reason is that there is too much moisture in the tofu. Step 2 is especially important because draining the tofu properly will ensure a nice, crispy tofu shell.
More Vegan Recipes
Teriyaki Tofu & Broccoli Stir Fry
Everything Bagel Crusted Tofu Sandwich
Tempeh, Broccoli & Sweet Potato Hash
If you try this recipe out, tag me on Instagram @veggiekins so I can see your delicious re-creations and feature them! As always, I love when you share your reviews in the comments below, and if you make any fun substitutions, let me know how it worked out below too.
Almond Crusted Crispy Baked Tofu Recipe
Ingredients
- 1 package extra firm tofu roughly 15oz
- 1/4 cup rice flour arrowroot starch (or cornstarch)
- 1/4 cup soymilk or other non-dairy milk
- 1 tbsp gluten free soy sauce
- 2/3 cups roasted almonds
- 1/3 cups roasted walnuts
- 1 tsp garlic powder
- 1 tsp onion powder
- 1/2 tsp smoked paprika
- 2 tsp nutritional yeast
- 1 tsp salt
- to serve with
- rice noodles
- bok choy
Instructions
- Preheat oven to 425F degrees while you prepare your tofu. If using an airfryer, please see notes below*
- Next, drain and press tofu using a tofu press, or wrapping your tofu in a kitchen towel and placing a heavy weight on top (a frying pan does a great job!).
- Prepare your nuts by dry toasting on a frying pan for a few minutes on medium heat. Continuously toss by shaking the pan, or using a spatula, so as not to burn. Even though nuts are already roasted, giving it a toast will help to bring out flavour and remove any excess moisture. You can skip this step but I highly recommend it! After toasting, let cool for a few minutes and blitz nuts in a food processor until mealy–don't blend too much or it will turn into nut butter! Think breadcrumb texture.
- Next, prepare 3 small bowls. In bowl 1, add rice flour. In bowl 2, add soymilk mixed with gluten free soy sauce. Finally, in bowl 3, add your ground nut mix with garlic powder, onion powder, paprika and salt.
- Now take tofu and slice into cubes. I like to slice into thirds horizontally as I find the smaller the tofu piece, the more flavour and crust per bite!
- Prepare a baking sheet lined with parchment paper or a baking mat and begin to coat tofu. Grab a tofu cube, coat in rice flour, quickly dip into milk mixture and finally toss and coat in the nut mixture. Transfer coated pieces onto baking sheet and repeat until all the tofu is coated.
- Bake for 12-15 minutes, flipping at the halfway point, until tofu is crisp and golden brown. If using an airfryer bake at 375F for about 12-15 min, flipping or shaking basket at the halfway point.
Notes
Secrets to Success
- I recommend using shallow, larger bowls when preparing your tofu so that it’s easier to coat tofu pieces evenly. If you’d like to take a shortcut, you can toss your tofu in flour in a larger bowl and shake to cover but do not shortcut the plant milk dipping step.
Serving Tips
To serve this tofu, you can actually bake it a second time with a favourite sauce on top. After baking, toss in the sauce and pop it back in the oven for 5-10 minutes. This is especially delicious with sauces like:- Healthy Buffalo Sauce
- Healthy Teriyaki Sauce
- Gluten Free Gochujang Sauce
- Barbeque Sauce (by Simply Quinoa)
- Sweet & Sour Sauce (by Okonomi Kitchen)
Storage Tips
- Store leftover crispy baked tofu in an airtight container in the refrigerator for up to 4 days. Reheat in the air fryer or stove top to retain the crispy and crunchy texture.
Nutrition information is automatically calculated, so should only be used as an approximation.
This post may contain affiliate links.